It was the first Christmas Eve in our new home, and a snowstorm had knocked out the power. We were huddled by the fireplace, wrapped in blankets, when my husband had the brilliant, simple idea: “What if we made grilled cheese… but fancy?” Using the last of our fridge scraps—a nub of aged cheddar, some cranberry sauce from a jar, and fresh rosemary from a potted plant—we crafted tiny, buttery sandwiches and toasted them over the fire in a cast iron skillet. They were messy, magical, and the most memorable part of the night. These mini grilled cheeses are the evolution of that idea. They’re not just a sandwich; they’re a warm, melty, festive bite of pure comfort, perfect for passing around on a tray with mugs of tomato soup. They’re proof that the most magical holiday moments often come from the simplest, cheesiest ideas.
Why These Will Be Your Holiday Hero
- They’re irresistibly cute and festive. The mini size and holiday-themed fillings make them feel special and celebratory.
- Endless customization. They’re a blank canvas for your favorite holiday flavors—sweet, savory, or spicy.
- Make-ahead magic. You can assemble them hours ahead and just toast them when guests arrive, making you a cool, collected host.
- Kid and adult approved. They are universally beloved, a guaranteed crowd-pleaser that bridges the generation gap.
The Master Method & Building Your Bite
The concept is simple, but a few key steps separate a good mini grilled cheese from a great one.
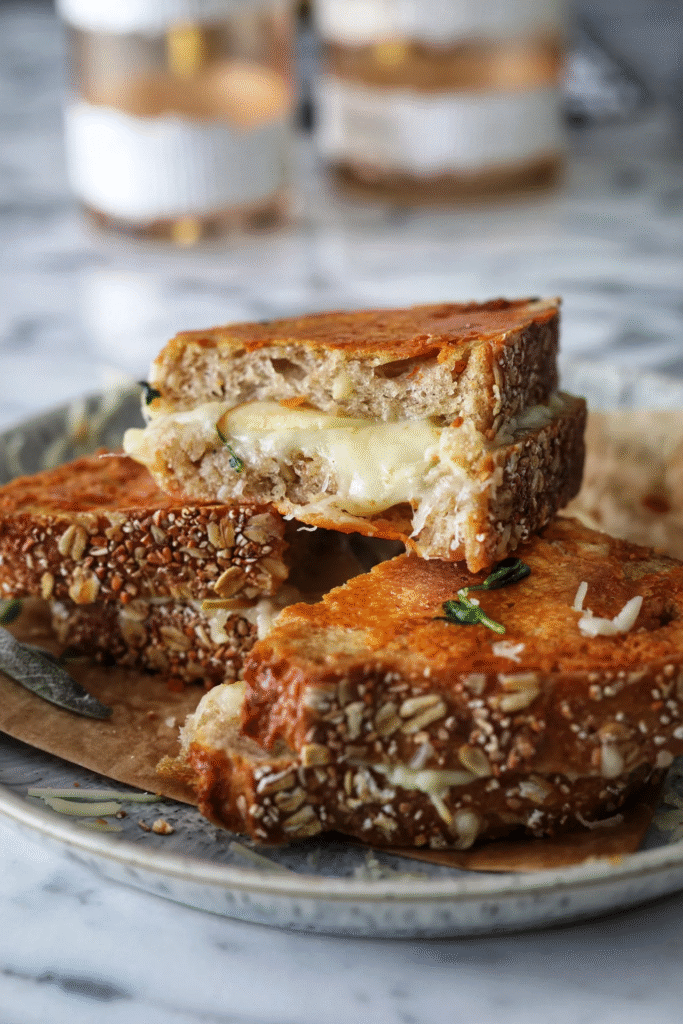
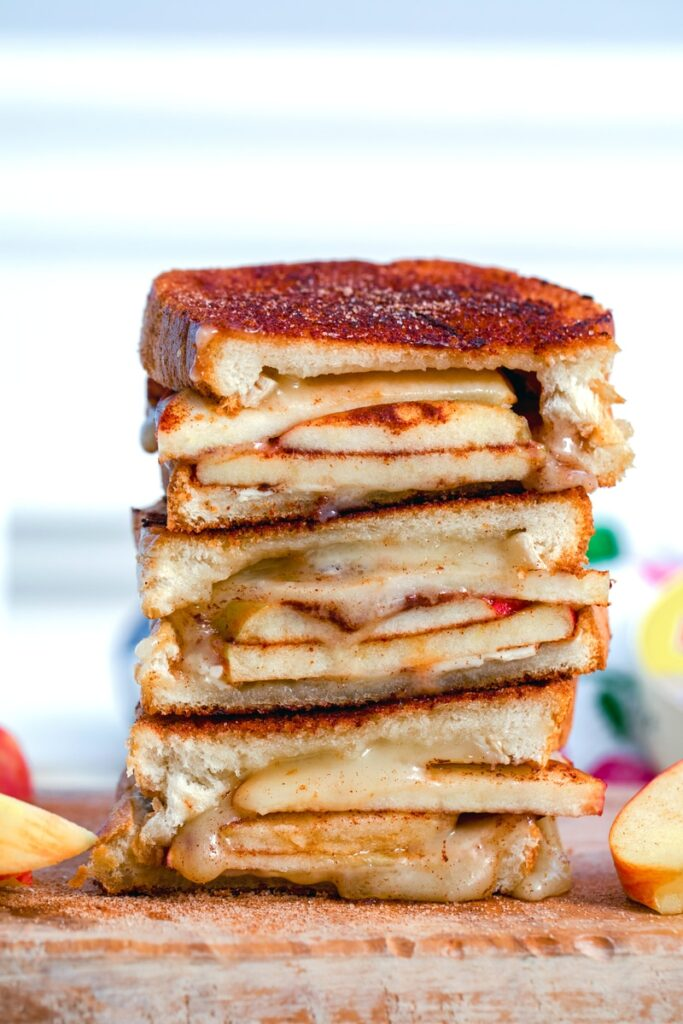
Step 1: The Bread. You need a good, sturdy yet soft white bread. I use Pepperidge Farm Very Thin White Bread or a soft brioche slider bun, sliced in half. Day-old bread is actually perfect here—it toasts up crisper. Use a 2-inch round cookie cutter to stamp out perfect circles. Save the scraps for breadcrumbs or feeding the birds!
Step 2: The Butter. This is the secret. Don’t just butter the outside. Mix room-temperature salted butter with a flavor boost. My go-to is stirring in finely grated Parmesan and a pinch of garlic powder. It creates an insane, crispy, savory crust. For a sweet version, mix butter with a brush of maple syrup and a pinch of cinnamon.
Step 3: The Build. Layer wisely. Cheese on both sides of the filling acts as “glue.” For wet ingredients like chutney, spread a thin layer between cheese slices to prevent soggy bread.
Step 4: The Cook. Low and slow is the rule. Use a non-stick or cast-iron skillet over medium-low heat. You want the cheese to melt completely before the outside burns. Press down gently with a spatula. They only need about 2-3 minutes per side.
5 Festive Flavor Combinations
1. The Classic Christmas: Cheddar, Cranberry & Rosemary
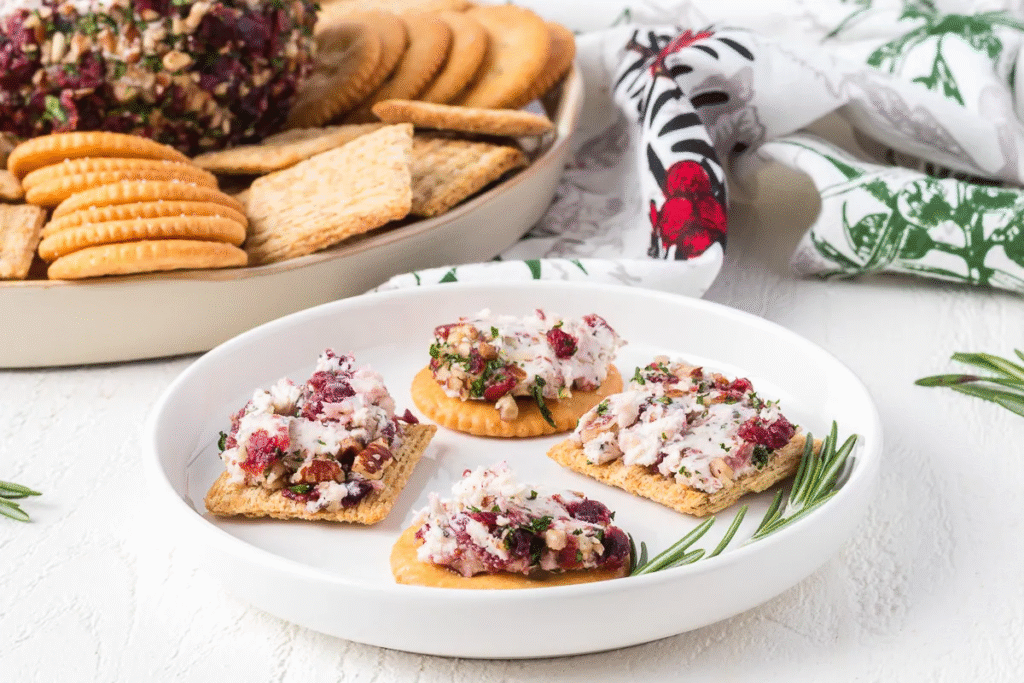
This is the iconic trio—tangy, sweet, and aromatic.
- Per sandwich: 1 slice sharp white cheddar, 1 tsp whole-berry cranberry sauce (the kind with berries, not jelly), 3 tiny fresh rosemary leaves.
- Build: Bread, cheddar, cranberry sauce & rosemary, cheddar, bread.
- Butter: Parmesan-Garlic Butter.
2. The Figgy Pudding: Brie, Fig Jam & Prosciutto
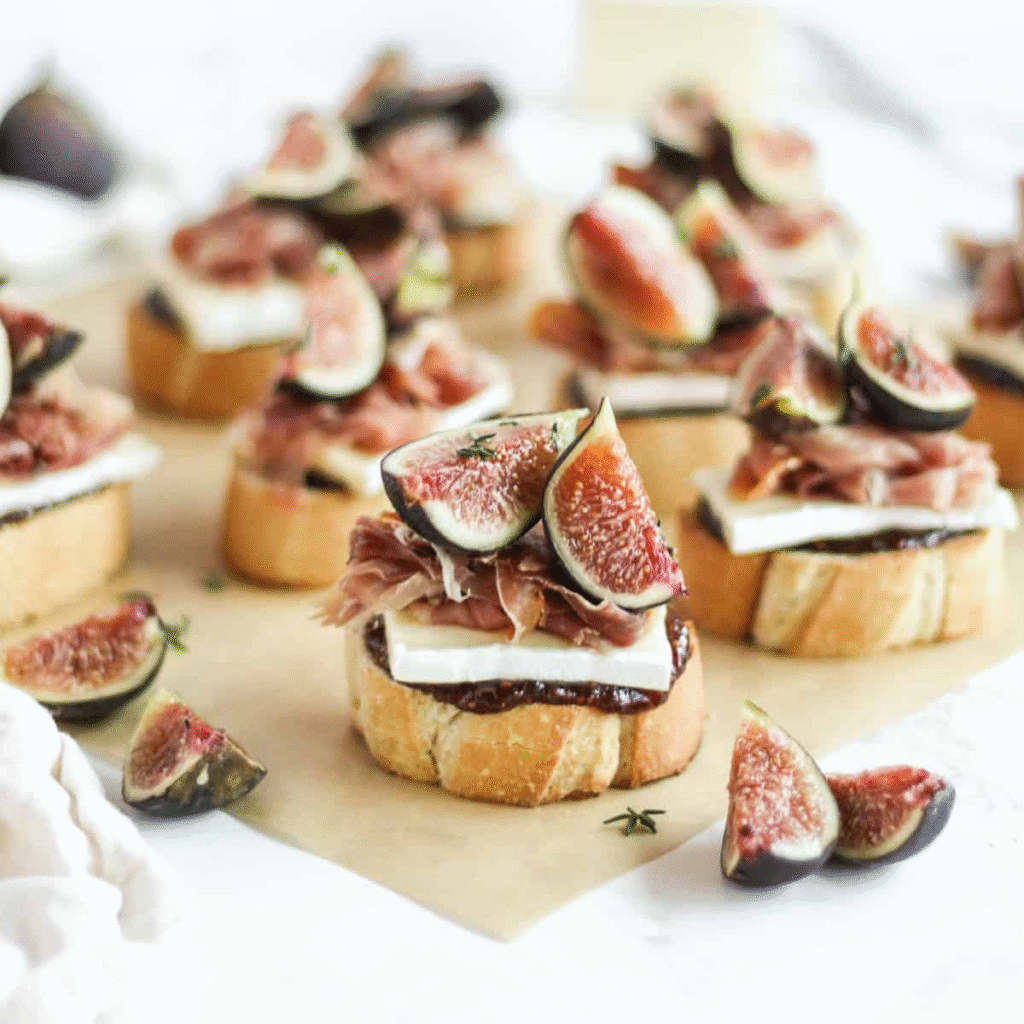
Elegant, rich, and perfect for a cocktail party. The salty prosciutto cuts through the sweet jam and creamy brie.
- Per sandwich: 1 slice triple-creme brie (rind removed), 1 tsp fig jam, 1 thin half-slice of prosciutto, torn.
- Build: Bread, brie, fig jam & prosciutto, brie, bread.
- Butter: Plain salted butter or honey butter.
3. The Alpine Ski Lodge: Gruyère, Caramelized Onion & Thyme
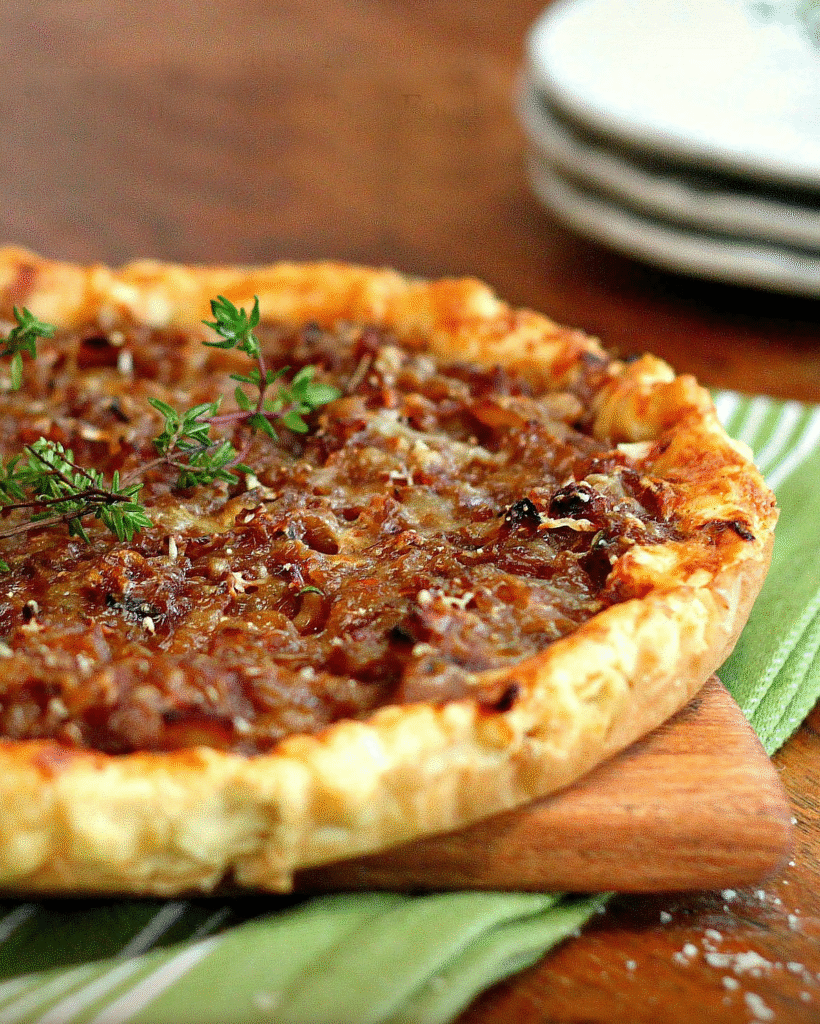
Deeply savory, smoky, and sophisticated. Tastes like a fondue in a bite.
- Per sandwich: 1 slice Gruyère cheese, 1 tbsp cold caramelized onions (make ahead!), 2 fresh thyme leaves.
- Build: Bread, Gruyère, onions & thyme, Gruyère, bread.
- Butter: Parmesan-Garlic Butter.
4. The Merry & Spicy: Pepper Jack, Apple Butter & Crispy Sage
A sweet-heat combination that will wake up everyone’s palate. The fried sage is a showstopping garnish.
- Per sandwich: 1 slice pepper jack cheese, 1 tsp apple butter, 1 small fresh sage leaf (fried crisp in butter for 10 seconds).
- Build: Bread, pepper jack, apple butter, pepper jack, bread. Top with crispy sage after cooking.
- Butter: Plain salted butter.
5. The Dessert Grilled Cheese: Brie & Gingerbread Spice Sugar
Yes, a dessert grilled cheese! It’s like a mini, melted, spiced cheesecake.
- Per sandwich: 1 slice brie (rind on is fine), 1 tsp mascarpone cheese mixed with a pinch of brown sugar and gingerbread spice.
- Build: Bread, brie, spiced mascarpone, brie, bread.
- Butter: Cinnamon-Maple Butter (butter + maple + cinnamon).
The Assembly Line: How to Feed a Crowd
- Prep Station: Cut all bread rounds. Prep all fillings (grate cheese, make compound butters, fry sage).
- Build Station: Lay out bread rounds. Butter one side of each round with your flavored butter. Flip half of them over (buttered side down). Add cheese, filling, more cheese, then top with a second round, buttered side facing OUT.
- Chill: Place assembled sandwiches on a parchment-lined tray. Cover loosely and refrigerate for up to 4 hours. This chills the butter, which prevents burning and helps them hold shape.
- Cook in Batches: Cook in a preheated skillet over medium-low heat until deeply golden and cheese is oozy, 2-3 minutes per side. Keep finished ones warm in a 200°F oven on a wire rack (so they don’t steam).
Health Benefits (Yes, Really!)
- Calcium & Protein: Cheese provides a solid dose of both, helping you feel satisfied and balancing blood sugar amidst the holiday sweets.
- Antioxidant Boost: Fillings like cranberry sauce, fig jam, and caramelized onions (from real onions!) contribute antioxidants.
- Mindful Indulgence: Their small size promotes portion control, allowing you to savor the rich flavors without overdoing it.
Pitfalls to Watch Out For
- The Great Burn: Too-high heat is the #1 enemy. If your butter is browning in 30 seconds, the pan is too hot. You want a gentle sizzle.
- The Cheese Exodus: Overfilling, especially with wet ingredients, will cause cheese to leak out and burn. Less is more. A thin, even layer of filling is key.
- The Soggy Bottom: Assembling too far in advance with very wet ingredients (like fresh tomato) will make the bread soggy. For wetter fillings, assemble just before cooking.
- The Cold Center: If the bread is perfectly brown but the cheese isn’t melted, your heat was too high. Lower it next time and cover the skillet with a lid for the last 30 seconds to trap steam and melt the cheese.
Alternatives & Swaps
- Dairy-Free: Use your favorite vegan cheese slices and plant-based butter. Violife and Miyoko’s are great melting options.
- Gluten-Free: Use a sturdy gluten-free bread. Toasting it lightly before assembling can help it hold up better.
- Bread Swap: No sandwich bread? Use Hawaiian sweet rolls split in half, or even puff pastry squares for a next-level, flaky “grilled cheese.”
- No Skillet? Use a panini press, or bake on a parchment-lined sheet at 400°F for 8-10 minutes, flipping halfway.
My Two Cents
The single most important tool is a great, small flexible spatula. It lets you easily get under these tiny sandwiches to check their color and flip them without destroying your beautiful layers. That, and patience. Let them get that perfect, deep golden-brown crust—it’s worth the wait for that audible crunch.
Serve these warm, maybe with little cups of tomato bisque or mulled cider for dipping, and watch them become the star of your holiday spread. They’re little bites of pure, melted joy.