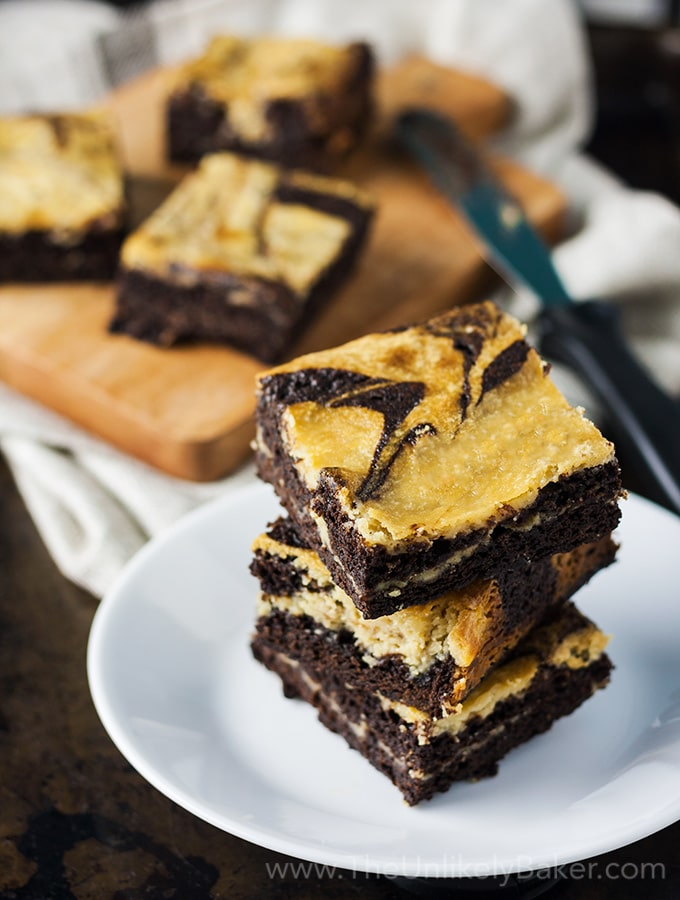
Listen. These brownies are not for people who want restraint. These are the kind you bake when you’re feeling a little dramatic, maybe a little chaotic, and 100% in need of something sweet, dark, and over-the-top. The moment you swirl that molten caramel into the glossy chocolate batter, you’ll understand—this isn’t dessert, it’s therapy.
The texture? Deeply fudgy, the kind that bends when you pick it up. The flavor? Dark chocolate meets buttery caramel with a little crunch of flaky sea salt right on top (like a mic drop). The first time I made them, I accidentally used too much caramel (if that’s even possible). The middle turned into this molten river of sugar lava—and honestly, best mistake ever. These brownies are for rule-breakers, midnight snackers, and anyone who thinks dessert should require a spoon.
🎯 QUICK FACTS TABLE
| Prep Time: | 20 minutes |
| Cook Time: | 30 minutes |
| Total Time: | 50 minutes |
| Servings: | 9–12 brownies |
| Difficulty: | Medium (but totally worth the sticky fingers) |
📝 INGREDIENTS (Chocolate meets caramel chaos)
- ½ cup (115g) unsalted butter – Melted and just starting to smell toasty.
- 8 oz (225g) dark or semi-sweet chocolate, chopped – Use the good stuff; it shows.
- ¾ cup (150g) granulated sugar – For that signature crackly crust.
- ¼ cup (50g) brown sugar – Adds depth and chewiness.
- 2 large eggs + 1 egg yolk – Extra yolk = extra fudgy.
- 1 tsp vanilla extract – The background whisper that makes everything taste like dessert.
- ½ cup (65g) all-purpose flour – Just enough to hold it together.
- ¼ cup (25g) cocoa powder – For that deep, rich chocolate tone.
- ¼ tsp salt – Balances everything.
- ½ cup thick caramel sauce – Homemade or store-bought (if it’s thick and sticky, it works).
- ½ tsp flaky sea salt – For sprinkling like the dramatic finisher you are.
👩🍳 HOW TO COOK!
1. Warm Up & Line It:
Preheat the oven to 350°F (175°C). Line an 8×8-inch pan with parchment, leaving a bit of overhang for lifting later (you’ll thank yourself).
2. Melt Magic:
Melt butter and chocolate together over low heat, stirring constantly until smooth and glossy. Let it cool for a minute—don’t add eggs to hot chocolate unless you’re making scrambled brownies (which… no).
3. Whip It Good:
In a separate bowl, whisk together sugars, eggs, and yolk for about 1 minute. You want it thick and shiny. This step gives you that signature crackly top.
4. Combine the Chaos:
Pour the chocolate mixture into the sugar-egg mix, whisking until you get this dark, lava-like batter that smells like pure happiness. Stir in vanilla.
5. Dry Stuff, Minimal Fuss:
Sift in flour, cocoa, and salt. Fold gently—no overmixing! You just want it smooth and glossy, like melted fudge.
6. The Swirl Moment (the best part):
Pour half the batter into your pan. Drop spoonfuls of caramel sauce all over, then swirl with a knife—gently, don’t overdo it! Add the rest of the batter on top, then swirl again with more caramel. It should look marbled, not messy.
7. Bake & Breathe In:
Bake for 28–33 minutes until the edges are set but the center still looks a bit gooey. (If your kitchen smells like a chocolate-caramel candle, you’re doing it right.)
8. The Finishing Touch:
While warm, sprinkle flaky sea salt over the top. Let them cool completely before slicing—otherwise, you’ll have hot caramel goo chaos (delicious, but wild).
📊 NUTRITION & TIPS
Pro-Tips Section: Little Tweaks, Big Results:
- [Substitution/Time Saver]: No caramel sauce? Melt soft caramels with a splash of cream for an instant version.
- [Essential Technique Tip]: Don’t overbake! Pull them when the center still jiggles slightly. They’ll firm up as they cool.
- [Flavor Boost]: Add a teaspoon of espresso powder to deepen the chocolate flavor—it makes the caramel pop even more.
❓ READERS ASKED, WE ANSWERED
Q: My caramel sank to the bottom. What did I do wrong?
A: You probably swirled too aggressively (we’ve all done it). Next time, drop smaller caramel blobs and swirl lightly just at the surface.
Q: Can I make these ahead?
A: Yes! They actually get better the next day as the caramel sets and the fudgy texture intensifies. Store covered at room temp.
Q: How do I clean the knife after slicing?
A: Wipe it between cuts. Sticky caramel will try to glue your knife shut, but that’s just a sign you nailed the texture.